This blog post is the second in a series about the Rational Integration Tester HTTP Proxy. If you are just now joining us, I suggest you drop back and first read
The Rational Integration Tester HTTP Proxy: What is it?
Now that we have covered what the proxy is, what it is used for and the basics of installing it, we will look deeper into using the proxy for its first application – recording. There probably is no better way to describe how the proxy works than “man in the middle”. That term strikes fear into most people. You think of malicious attacks on web sites bent on malfeasance. In such attacks, a 3rd party finds a way to convince a client application to allow it to listen in as that client talks to a service it uses. In an attack like that, the goal is to enable the 3rd party to harvest information in those messages. Although the Rational Integration Tester HTTP proxy uses the same general approach, you are the 3rd party and the purpose of harvesting information in those messages is ultimately to create either tests that replicate the client or stubs that emulate the service.
Yes, there are security implications here. And that’s exactly why you really need to understand what is going on and how to ensure you are only giving the Rational Integration Tester HTTP Proxy access to your messages. The next post in this series will dig deeper into security, but we need to get a foundational understanding of how to set up an unsecured system first and then build on that.
Overview
The overall process you will follow consists of the following steps:
- Understand the System Under Test (SUT)
- Configure the client to route requests through the proxy.
- Verify the SUT works correctly with the proxy in place.
- Model the endpoint in Rational Integration Tester and verify you can access the service.
- Use RIT to record as you send messages to the service by exercising the client.
The Process
Understanding the System Under Test
This probably sounds obvious. Of course you need to understand the system you are testing. But the system you want to test is probably a complex mishmash of subsystems and sub-subsystems sending messages through all sorts of protocols and message formats. What do you need to know about the system and what is just extra information that doesn’t help? Ultimately any given communication path you want to record boils down to a client sending messages and receiving responses from a service. Let’s consider a simple example where a web client application running in Tomcat consumes a service that provides hotel search and booking:

Simple Communication Architecture
The key details you need to know are the hostname of the server hosting the service and the port number on which the service listens. In the example, the hotel service runs on a fictitious server called myHotelServer.com on port 8089. Once we start considering authentication and security, there will be other things you will need to know, but we will get to that later.
Configuring the client
Recording messages with the proxy requires that you reconfigure your System Under Test (SUT) a bit. This might sound like invasive testing. The thought that you must tweak your system in order to enable testing might rub you the wrong way. But then again, think about it this way: should your SUT allow just anyone to tap into the wire and record messages? Rest assured that Rational Integration Tester – or any other tool – can’t somehow sneak into a properly configured and secured system to record data. You must deliberately configure your system’s client to allow this recording to occur. This is a necessary thing – and a good thing.
The specific steps required to configure your client will depend on the container your client runs in. Some specific technologies are addressed in the InfoCenter. In the case of most Java-based containers, you will be able to add two Java startup switches to the command line that launches the container and then restart the container. For our example where the client is running in Apache Tomcat, we would add the following switches to the script that launches Tomcat:
-Dhttp.proxyHost=myHotelServer.com –Dhttp.proxyPort=3128
Note that the InfoCenter recommends editing catalina.bat or catalina.sh. I prefer to keep environment settings like this localized to the setenv.bat or setenv.sh scripts.

Simple Architecture configured for Proxy
As long as your client application correctly uses the standard Java HTTP client libraries, this will cause it to route messages through the proxy. There are many corner cases where simply setting these two switches will not be sufficient. This all depends on how the client is implemented. For now, let’s assume this works for our example. Troubleshooting these corner cases may be a good topic for a future blog article.
Verifying the System Under Test
Before you go any further, it is very important that you verify that A) you haven’t broken your SUT and B) messages are actually routing through the proxy. It is easy to make typos when modifying textual startup scripts so double-check your edits.
Start the Rational Integration Tester HTTP proxy. As we discussed in the previous blog article, you normally want to have the proxy installed as a Windows service and have it start automatically upon boot. Now is a good time to NOT do that. Go to the Windows Services and stop the IBM RIT HTTP Proxy service. Now navigate to your proxy install location (C:\Program Files\IBM\RIT-Platform\httptcp by default) in a command prompt and launch startup.bat. Many lines of logging information will scroll by. This may be worth referencing later if you have problems.
If you haven’t done so already, restart your client application. You will need to restart for the startup directives to take effect. It is worth checking log files in your client that might indicate whether or not the client picked up your startup directives.
Now try invoking the service from the client. The first thing to verify is that the client gets the response you would expect and does not get errors. If your client isn’t able to send the request or get a response back, then you broke something. One thing to verify is that you started the proxy. If the proxy isn’t running, no messages will get through.
Secondly, check the command window where you launched the proxy. You should see a number of new logging messages. In particular, look for the string “proxy rule found: Proxy on port 3128”. This indicates that the request made it from the client to the proxy. Further down in the messages you should see something like “Sending request message to endpoint”. A little further down you should see “Reading response message from endpoint”.
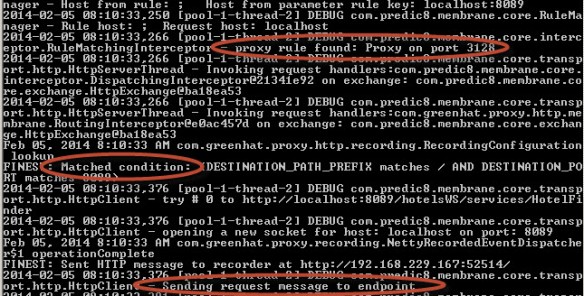
Proxy messages indicating a successful route
Don’t bother proceeding if this isn’t happening for you. There are a number of possible reasons that messages aren’t getting through. Firewalls are common blockers. You will need to correct the situation because nothing beyond this point will work.
Configuring the RIT model
With the proxy in place and verified, we are ready to model the system in Rational Integration Tester in preparation for recording. I wrote some weeks ago about the model in Rational Integration Tester. Since this post is about the proxy, I’ll stick to the bare minimum modeling and focus on what we need to get a recording.
At a minimum, you will need a logical HTTP Connection and a physical Web Server in your model. Create the HTTP Connection in the logical view. Create a physical Web Server. On the Config > Settings tab, enter the host and port of the hotels server.
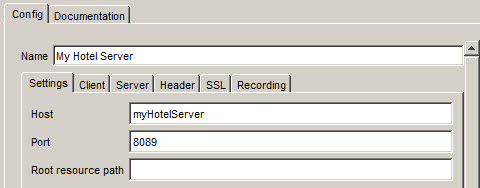
Physical resource for the Web Server
Note – you should NOT be entering any information about the proxy here. Rational Integration Tester handles all the proxy stuff behind the scenes with the help of Rational Test Control Panel. All you need to do in the model is describe the SUT.
Also, switch the Recording Mode on the Recording tab to External Proxy Server. This is not the default. If you forget to switch the recoding mode to use the proxy, you will get no errors or messages, but you will get no recording. If it is any comfort, you won’t be the first to forget this. It happens all the time.

Recording Mode setting on the physical Web Server
Recording events
Start up recording in RIT on the HTTP Connection. You should see a couple more messages appear in the proxy command window such as “Added recording rule…”. This appears when RIT registers a rule in the proxy which tells the proxy to copy all the messages it sees and send them to RIT where they will appear as events in the Recording Studio perspective.

Proxy message indicating a recording rule
In the events view, you should now see the messages that were recorded. In our example, the client sent a request consisting of an HTTP POST to the getHotels operation on the Hotel Server. The service replied with a list of hotels in an XML message.
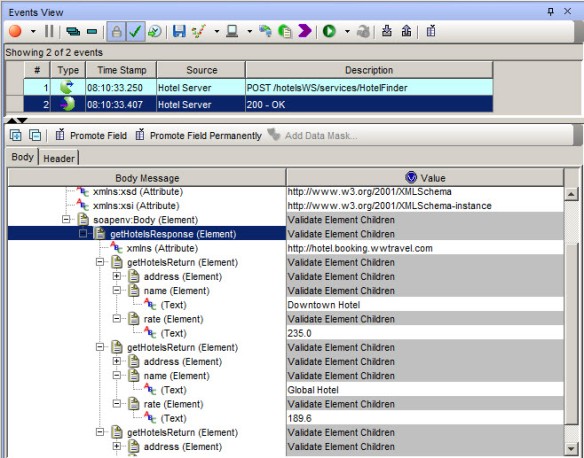
Recorded events in RIT
These events can then be used to create operations, requirements, tests or stubs.
With the recorder engaged, here is what you really have in place:
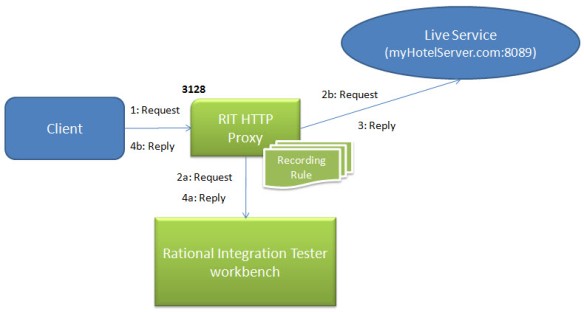
Recording Architecture
The request comes from the client destined for the service, but routed through the proxy. The recording rule that has been registered with the proxy causes it to send a copy of the request to RIT at the same time that it forwards on the request to the service. When the service replies, the proxy once again sends a copy of the reply to RIT while forwarding on the reply to the client.
I have left out some important details such as the role of the Rational Test Control Panel but I wanted to keep things fairly simple for now and focus on the role of the proxy. Hopefully this article has helped clear up any confusion you may have had around recording basic HTTP with the proxy. In my next post, I will look at recording HTTPS which adds another dimension to things.

